
As part of my adventure in fixing the Sun Blade 150’s NVRAM battery failure, I also updated the system firmware to v4.17.1. The update wasn’t strictly necessary, as it didn’t address any immediate issues I had, and it certainly didn’t fix any issues that I had regarding the NVRAM, but its rarely a bad idea to have the system running the latest (or in this case, final) firmware release.
Reading through Sun’s documentation shows that the process is relatively straight-forward.
Basic Steps
- Obtain the update.
- Determine if update is necessary.
- Transfer the update file to the internal hard disk.
- Power off the system and change the JP2 jumper on the motherboard to allow for firmware writes.
- Power on the system and run the flash update.
- Restart the system and confirm the new version.
- Power off the system and return the JP2 jumper back to its original location.
The actual update process itself is straightforward, so I’ll only highlight the key details.
Obtain the Update
One of the big problems with vintage systems, especially ones that were actively supported during the early Internet era, is that of link rot. You can find a LOT of dead URLs in Sun documentation, blog and form posts, and general search engine results. Especially with a company that embraced the Internet as much as Sun, you’ll find a lot of links that just generally don’t go anywhere anymore, or are now behind an Oracle paywall. You’ll find a lot of references to things that were once on a corporate FTP server that is now long gone. You’ll find a lot of things that nobody thought to keep, or things that nobody would have *wanted* to keep.
Then, throw in a relatively uncommon system like the Blade 150 which reached its peak in the early 2000’s, and you can have a hard time getting things.
I found that the Blade 150 even has firmware updates at all by simply doing a Google search. Unhelpfully, an Oracle page cheerfully says “Always check the Sun web site for the latest compatible Solaris Operating System, firmware, and software updates.” Not exactly useful anymore. Helpfully, however, an Archive.org page showed that there was once a firmware update available and now provides those files for download.
The Archive.org page, has a file called “Sun Blade 100 & 150 Flash PROM 4.17.1 119235-01.zip”. Inside the ZIP file are the firmware files themselves, as well as documentation. Sun seems to call the update “Patch-ID# 119235-01”. As far as I can tell, the update is from roughly April of 2005. The laundry-list of updates is quite extensive, at least 30 different fixes.
Now, of course I won’t just blindly trust an Archive.org page, but the ‘Sun System Handbook’ from June of 2011 confirms that 4.17.1, from patch 119235-01 seems to be the last release for the Blade 150. Unfortunately the link on the handbook page links to an Oracle website, which appears to now just redirect to their normal support page, not a download page.

So I downloaded the file from Archive.org and went on my way.
On a side note, I’m looking for the Sun System Handbook or Field Engineer Handbook in offline format. Either a dump of a website, or preferably, original disc captures. So far I have only been able to locate the v3.4 of the book on Archive.org here. There are many other versions of the handbook available online, but I’d rather not have to crawl those websites to get my own copy.
Determine if the update is necessary
To update or not to update? With firmware upgrades, generally one can assume a certain amount of risk, but also a certain amount of reward. Downtime, botched updates, failures, new bugs/issues being introduced, etc. all have to be balanced with potential improvements, fixes, and usability changes. In the case of an update that is a few years old, it can be argued that there really isn’t any risk anymore. The update is probably fine, or the vendor would have not released it, or at least, would have quickly released an updated version. And if anything, the Internet would have complained about it a lot if there were lasting consequences. Essentially, as time goes on, the risk of applying a system update becomes less and less, eventually reaching such a low point that the risk can essentially be summed up as ‘Eh, why not?”.
However, the risk/reward ratio can start an interesting upward trend past this low point. The risks for vintage computers start to rise – do you take the risk of breaking a system that could be irreplaceable? Would doing the update damage or otherwise change a known working vintage system? Is there value in keeping a system at an older release? Is it more ‘rare’ or ‘authentic’ to have an old version? Are you trying to target a particular vintage for that particular vintage machine, where you would prefer to have an old version? And so on.

In my case, I intend to make my ‘150 as good as it can be, and part of that is the firmware being updated.
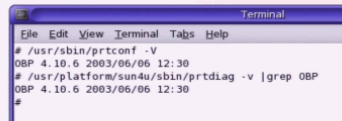
Now, from a purely technical standpoint, we also need to determine if the system even NEEDS the update, aka is it already at that version or higher? The Sun documentation includes instructions on querying the system, both through the OS or through the OpenFirmware prompt.
In my system’s case, it was still able to boot and run Solaris, so I could run the OS command, as well as verify with the OpenFirmware prompt. It was running 4.10.6 from 2003, so it was a candidate for upgrade.

Transfer the update file to the internal hard disk
The update instructions describe the steps necessary to put the update file in the correct location, namely the root filesystem with ‘755’ permissions. Easy enough. I transferred the file over to the system using SCP, ran the chmod commands, and then powered off the system.

Power off the system and change the JP2 jumper on the motherboard to allow for firmware writes
This step was interesting, as I had to locate the JP2 jumper on the motherboard. It is located between the NVRAM chip and the backplane connector on the motherboard, directly next to JP1. The floppy drive cable tends to lay over the top of the jumpers so it can be hard to locate. I simply moved the jumper from positions 1+2 to 2+3. In the picture below, the jumper was originally on the lower two pins, and was moved to the upper two pins. An additional view of the board can be seen here.
Power on the system and run the flash update
This step may change depending on how your system is configured/working. Essentially you want to break out of the normal boot sequence with the STOP-A keys to get to the OpenFirmware ‘ok’ prompt. In my case, my NVRAM is dead, so it goes to the ‘ok’ prompt regardless.
Once at the prompt, you simply tell it to boot/run the firmware file.

Here I will skip over the exact details of the update, as the instructions Sun created are better than I could duplicate. Essentially I followed the prompts as instructed, and it updated the system firmware without issue and automatically restarts the system.
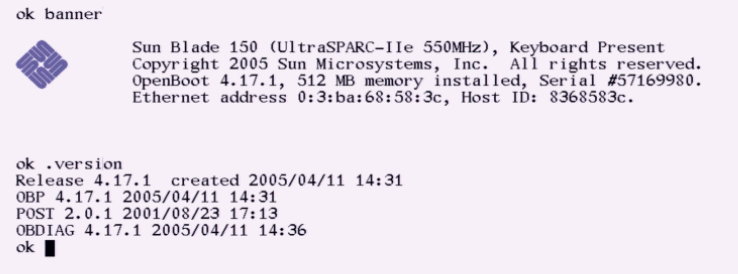
Confirm the new version
Once again, you want to get to the ‘ok’ prompt. The boot banner should now show the updated version, but you can also verify this with the ‘.version’ command. If the version is correct, and the system behaves the way it should, power off the system once more.
Power off the system and return the JP2 jumper back to its original location
Finally, with the system powered off, return the JP2 jumper back to the original 1+2 position.
The process is now complete!