
Recently the museum was able to pick up a few new goodies for the DS3512 storage array, two EXP3512 (1746-E2A) expansion shelves, and 12x 3TB 81Y9878 disks.
The disks were purchased separate from the expansion shelves – clearly a vendor was scrubbing the disks and selling them as general purpose 3TB SAS disks without caddies and not inside an array. Thankfully they have the desired IBM firmware identifying them as 81Y9878 disks, allowing them to work on the 3512. Installing the disks was a relatively easy task, but it was noted that the disk firmware was down-level from what was available.
To Update or Not To Update?
In general, there are a few things to consider before performing a drive firmware update.
Is there an updated drive firmware available at all? If so, what changes does it make?
If there aren’t any updates available for your drive, then obviously, there’s nothing that needs to be done. How do you even find out?
Generally, with most storage arrays, drive firmware is usually available from your storage array vendor. In this case IBM. Also, that firmware is not necessarily the same firmware available from the drive manufacturer themselves. In this case, that is absolutely the case! IBM likes to create custom firmware for its drives. In this way, several different vendors of drive can ‘appear’ to be the same drive to the storage array. For example, there are at least three different 3TB NL-SAS vendors that are compatible with the DS3512 storage array; Hitachi, Seagate, and Fujitsu. Finally, the drive firmware is usually specific to the storage controller as well. Again, in the case of IBM, there are specific firmware for the same 3TB Hitachi disk for both the DS3000 storage array series, as well as the Storwize 5000 series, with the firmware being different from each other.
The next question is, if there are updates available, are the changes made helpful to your situation? Usually storage vendors don’t release firmware updates willy-nilly, they’re usually for something important. Generally, if there is a firmware for a drive, its a safe bet that it’s desirable to be applied to your drive. Thankfully, they usually release a change log or readme with the firmware updates explaining what the change is. If the update is for something relatively trivial, like SMART data reporting, that could be considered low priority. Or if the update is for something like improving drive reliability, that could be considered high priority.
Next, is the drive part of an active configuration and if so, can the drive be updated when in use? If the drive firmware can’t be updated in an ‘online’ state, you can’t use the drive at the time, which usually means you need to have any constructs the drive is part of be in an offline state. When reviewing the firmware update through the update tool, it will let you know if this would be an issue. Sometimes a power-cycle of the drive is required for the firmware to take effect. Again, consult the documentation to be sure.
Does the storage array support the new drive firmware? Generally if you’re getting your drive firmware from the storage array vendor, it will be compatible, or at least compatible with a particular storage array version. If not, you can’t run it on that array! Usually this is an issue only with modern drives and controllers, such as a modern drive in an array with an older controller. In the case of our circa 2012 vintage DS3512 array, we are running the most recent (circa 2017) controller firmware (v08.20.27.00), and updating a drive to a circa 2013 firmware. The likelihood for success is high. Often requirements and dependencies are listed in the firmware readme or change log documents. IBM also has a specific DS3000 recommended firmware levels page here. The general crux of the document is that you should run the most recent controller firmware version.
Finally, considering all of the above, does the value of the update outweigh the risks of performing the work? If the value proposition is good, then its worth running the update. In the case of this DS3512 array, the drives are ‘new’ so there is no harm in running the update.
Obtaining Drive Firmware
As mentioned previously, drive firmware should be obtained from the storage vendor, and often specifically for the array itself. In the case of the DS3512, IBM provides a specific ‘DS3000’ series firmware that is compatible with the array.
Drives with incompatible firmware will not work on the array!
This usually means that ‘random’ drives found will not work on the array. In theory the DS3000 series arrays use standard SAS or SATA drives, but they will not work with just any drive, they have to be first flashed with the IBM firmware.
IBM provides a few firmware packs for the IBM DS series of storage arrays. Here at AIX Museum, it has been found that the v4.23 firmware pack from 2012 is the most complete and most relevant. It can be found here:
https://delivery04.dhe.ibm.com/sar/CMA/SDA/079eh/0/ibm_fw_ds3khdd_4.23_anyos_anycpu.zip
Another pack, v4.50 from 2013 is also available, at the link below, but it has been found to be less complete, and not cumulative.
Determining Current Drive Firmware
- Open DS Storage Manager for your DS3500 and authenticate as Administrator.
- Browse to the ‘Hardware’ tab on the main page. i. Here you can see we have just one enclosure, with the drive to be updated in slot 10. (In actuality, the drives in slots 10, 11, and 12 all require the firmware.)
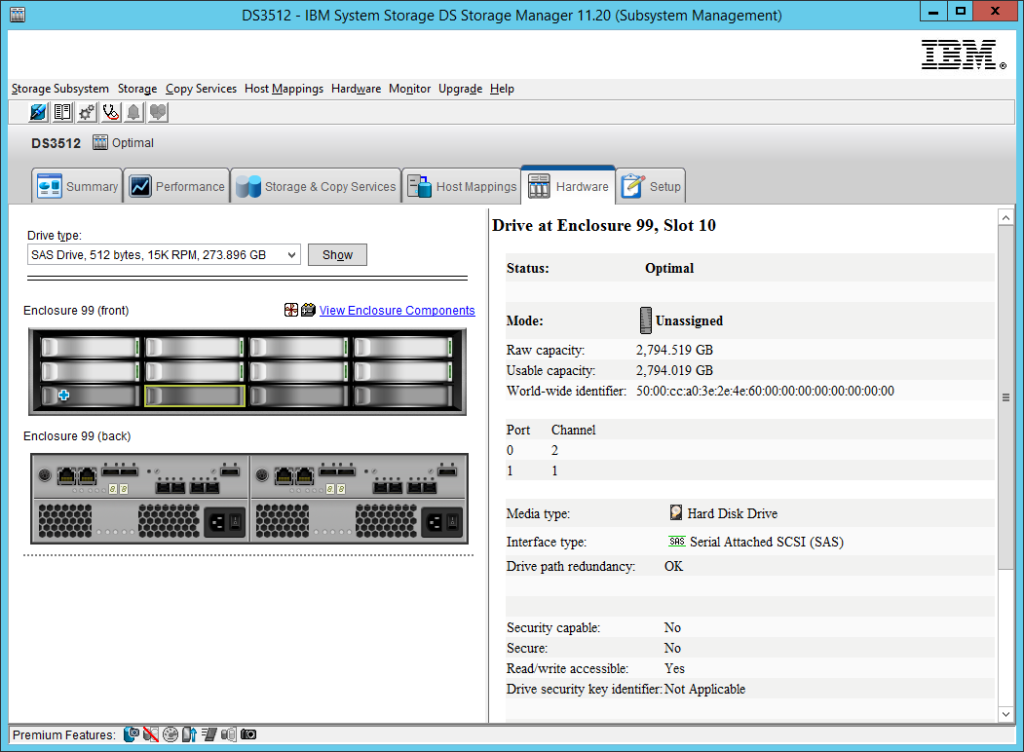
- Click on the drive to be updated. Scroll down to the bottom of the drive details and note both the ‘Product ID’ (the drive model number) and ‘Drive firmware version’.
- In this case we have a ‘HUS723020ALS64’ drive. This, as well as the serial number, should match the details found on the label on the top of the drive.
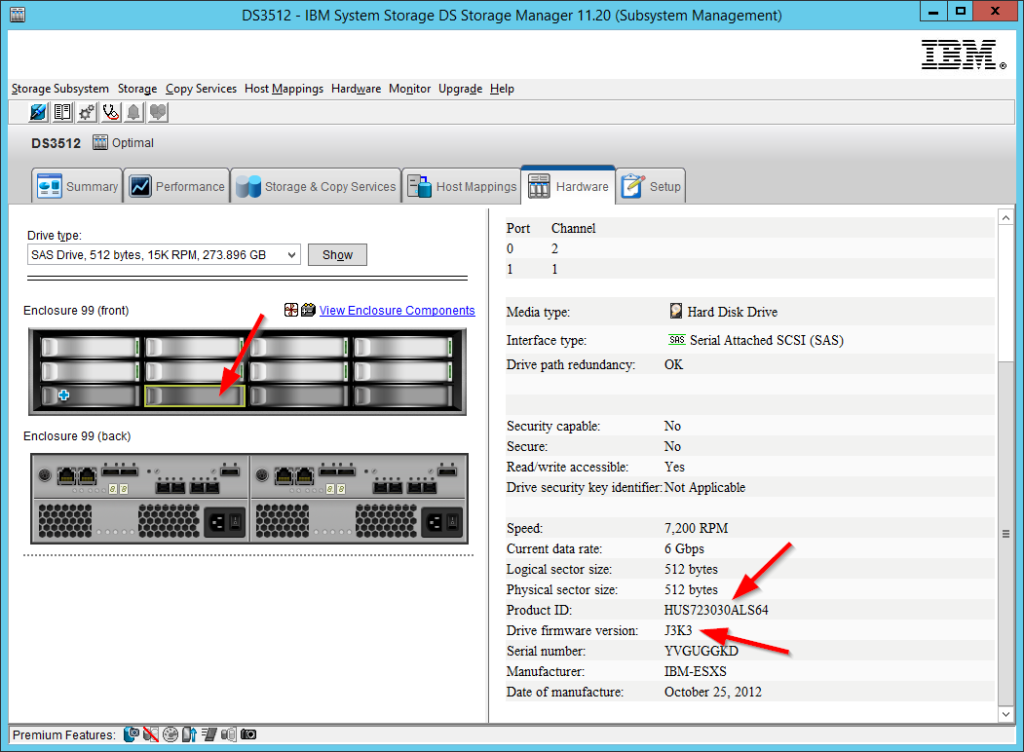
- On a special note, the IBM software will truncate the product ID at 14 characters. Because of this, the model number of the drive is actually ‘HUS723020ALS640’, a Hitachi Ultrastar 7200RPM, 6Gbit SAS drive. IBM describes this in the v4.23 firmware pack readme file:
“…as a product design specification the Product ID is limited as a 14-character string. Therefore only the first 14 characters in Product ID are shown…”
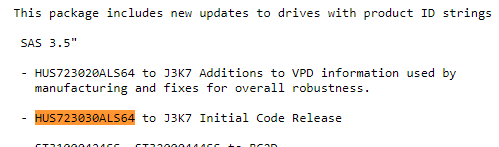
- Note that the current firmware for the drive is reported as being ‘J3K3’. This firmware level is listed in the IBM firmware pack change file as having been released on December 6, 2012. The change file also indicates that a new firmware, ‘J3K7’, was released on May 6, 2013. Apparently the J3K7 firmware update includes fixes for ‘overall robustness’. Seems desirable.
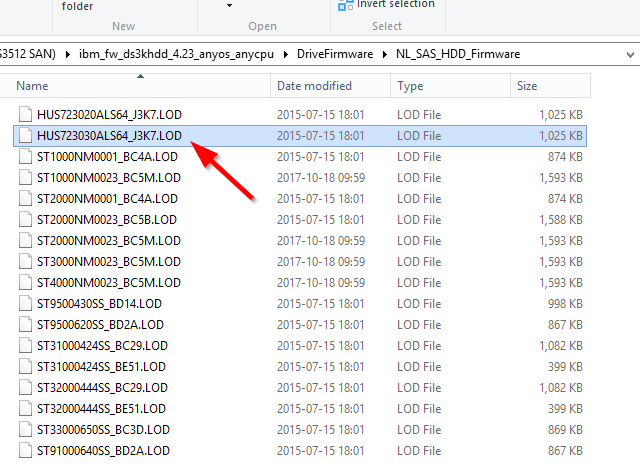
- Looking through the firmware package, we see that we have a file called “HUS723030ALS64_J3K7.LOD”, matching our drive and our desired firmware level. We are ready to proceed.
Performing the Update
- Open DS Storage Manager for your DS3500 and authenticate as Administrator.
- Click the ‘Upgrade’ menu item, then ‘Drive Firmware…’.
- The Drive Firmware Download screen will appear. Note the ‘Current firmware packages’ section. This displays the current firmware versions of the drives that are connected to the array. Note that the ‘HUS723020ALS64’ drive shows ‘J3K3’, the version we saw earlier.
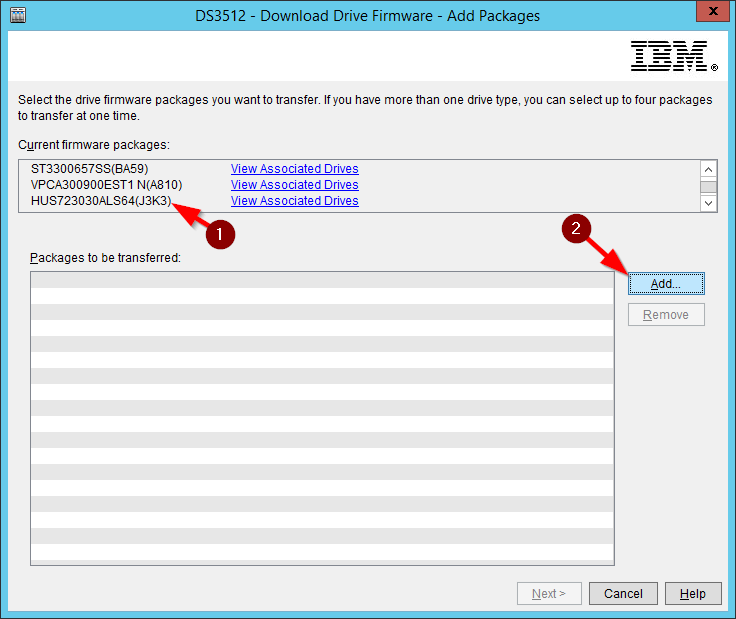
- Click the ‘Add…’ button. Browse to the firmware file you located earlier and click on it.
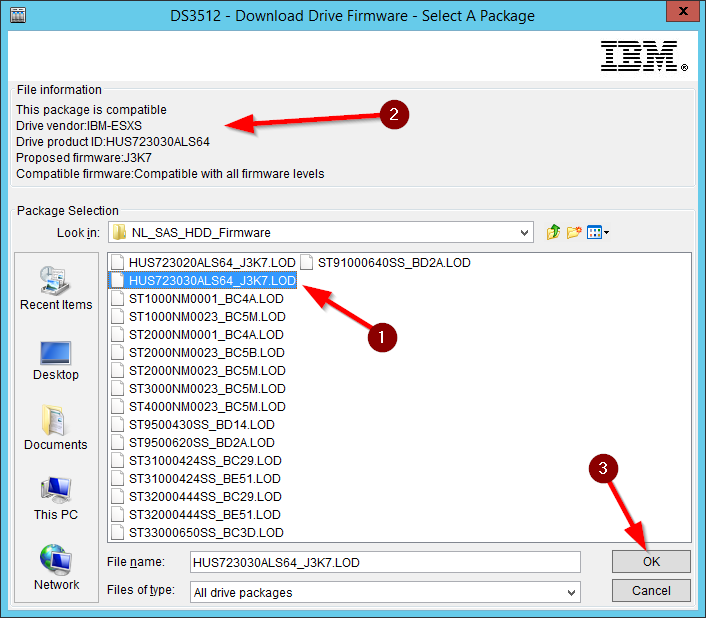
- Note the file information section at the top. Here it shows that the firmware update is compatible with a drive or drives in the array, that is is compatible with our drive vendor, it is for our intended drive, it is the expected version, and it is compatible with our array firmware.
- Click the OK button. The Download Drive Firmware window will display again.
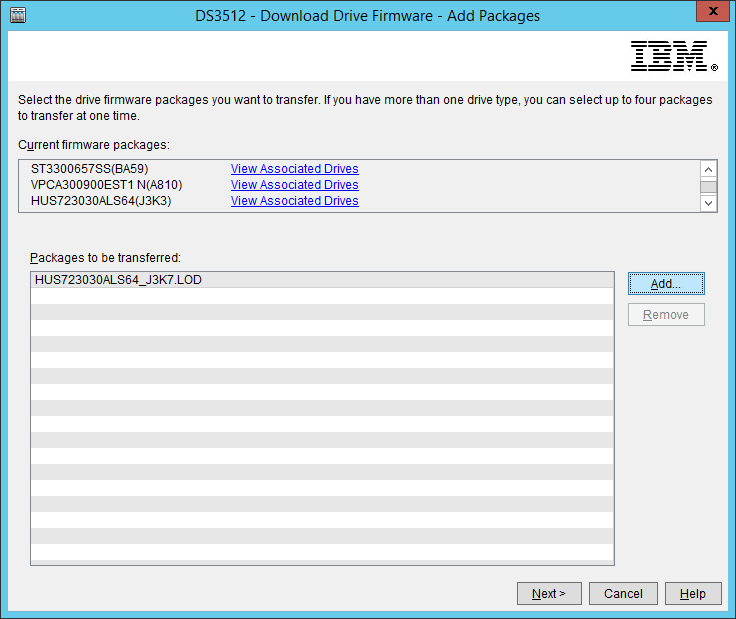
- Note the ‘Packages to be transferred’ section has updated to display the requested firmware to be transferred.
- Click the Next button. The drive selection screen will now display.
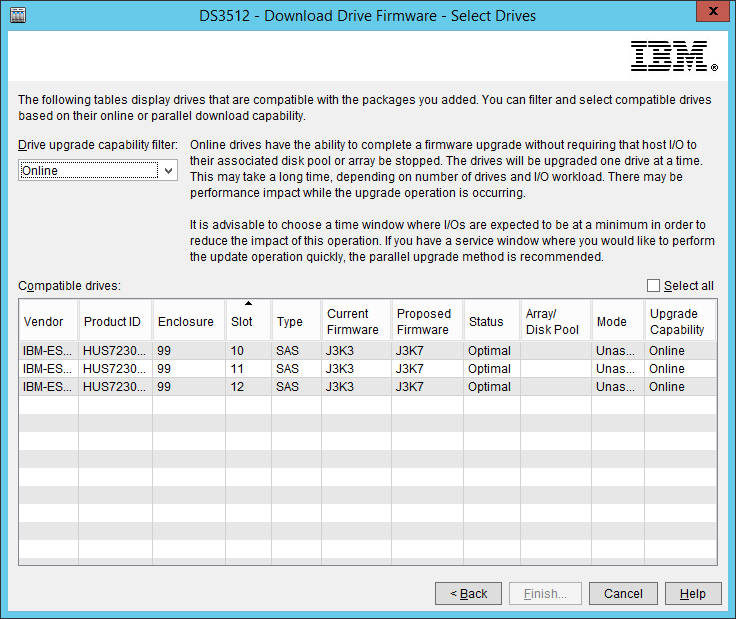
- Note the various drives and their associated statuses. In this case, we have three drives, each that can take the J3K7 firmware in an Online state.
- Click the ‘Select All’ checkbox, and then click Finish. The Confirm Download window will display.
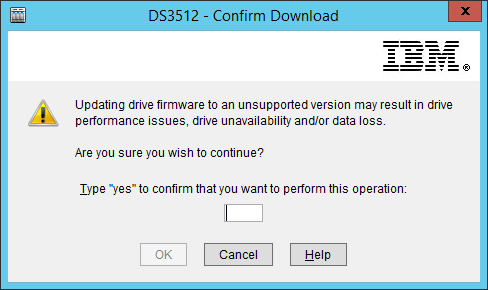
- If you are sure you want to proceed, type ‘yes’ in the text box and click OK.
- The firmware upgrade will start. The Download Drive Firmware – Progress window will display.
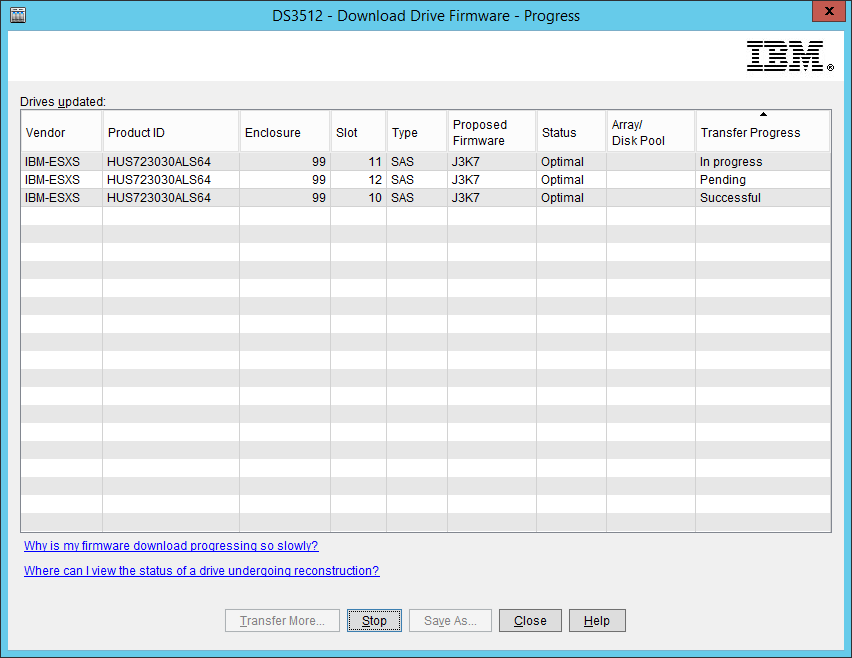
- Note the transfer progress column on the far right. As the drive updates complete, the status will change from Pending, to In Progress, finally to ‘Successful.
- When complete, it will say ‘Successful’ in the transfer progress column for all drives.
- Click ‘Close’ to close the window.
- Process is complete.